In a previous post, we talked about how to create a blog with Deno and Lume. In this post, we will make it accessible publicly with Deno Deploy.
To follow this post, you need a file structure similar to the one created in the section Create files and directories. Let me remind you how it looks like:
I used Lume, a static site generator, to generate our blog. So I have configured our deno.json file with frequently used scripts into the tasks field and our necessary libraries into the imports field.
Our objective is to run a web server which will serve the directory .lume/_site, produced by the build task. The server will be deployed to Deno Deploy.
What is Deno Deploy?
Deno Deploy is a service for hosting Javascript application. Your application is hosted on server geographically close to your users, which enable low latency and fast response times.
Deno Deploy has a free plan for side-project, like a blog.
For this post, I prefer to use deployctl, a command line for Deno Deploy. Even if we will use Github Actions as our CI/CD tool, it will be easier to adapt the automation section to your CI/CD pipeline.
CI/CD stands for Continuous Integration and Continuous Delivery/Deployment.
As of January 2024, Deno Deploy use Github as its primary integration. You need a Github account to connect to Deno Dashboard.
Let's start with our entrypoint. The entrypoint will start a web server and will serve .lume/_site/ directory.
Edit .lume/entrypoint.ts:
// my-awesome-blog/.lume/entrypoint.ts
import Server from "https://deno.land/x/lume@v2.0.2/core/server.ts";const server = new Server({ root: `${Deno.cwd()}/.lume/_site`, port: 8000,})server.start();
Let's add a task preview to run the .lume/entrypoint.ts:
// my-awesome-blog/deno.json
{ "imports": { "lume/": "https://deno.land/x/lume@v2.0.1/", "blog/": "https://deno.land/x/lume_theme_simple_blog@v0.10.2/" }, "tasks": { "lume": "echo \"import 'lume/cli.ts'\" | deno run --unstable -A - --config .lume/config.ts", "build": "deno task lume", "preview": "deno run -A .lume/entrypoint.ts", "dev": "deno task lume -s" }}
The preview task mainly exists for testing your server locally. Deno Deploy will run .lume/entrypoint.ts by itself.
Now we will add a deploy task and a new deploy field for configuration.
The new deploy field will contains following configurations:
project is the name of your project. It can be whatever you want.
entrypoint targets the script file executed by Deno Deploy.
include lists files and directories to be deployed.
exclude lists files and directories to not be deployed.
// my-awesome-blog/deno.json
{ "imports": { "lume/": "https://deno.land/x/lume@v2.0.1/", "blog/": "https://deno.land/x/lume_theme_simple_blog@v0.10.2/" }, "deploy": { "project": "YOUR_PROJECT_NAME", "entrypoint": ".lume/entrypoint.ts", "include": [ "./.lume/entrypoint.ts", "./.lume/_site" ], "exclude": [ "**/node_modules" ] }, "tasks": { "deploy": "deno run --env -A https://deno.land/x/deploy@1.10.3/deployctl.ts deploy", "lume": "echo \"import 'lume/cli.ts'\" | deno run --unstable -A - --config .lume/config.ts", "build": "deno task lume", "preview": "deno run -A .lume/entrypoint.ts", "dev": "deno task lume -s" }}
Pay attention to the YOUR_PROJECT_NAME value. You must replace it with your own project name or remove this line. If you choose to remove the line, Deno Deploy will generate a name for you and will set the project field with the project id.
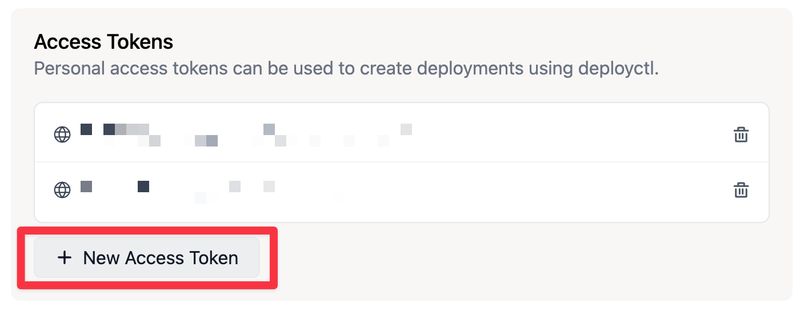
Here is our last step. Go to account settings, then look for Access tokens section. Click on New Access Token button.
Once generated, run the command below with your access token:
This is our first deployment, so Deno Deploy deploy to production by default.
If you omitted the project field, your deno.json has been updated with the project field setted.
You can visit your application at two URLs: the preview URL and the production URL.
As it is our first deployment, the two URLs target the same deployment specified by DEPLOYMENT_ID. If you run the deploy task a second time, you only have the preview URL with a different DEPLOYMENT_ID.
To promote a deployment to production, you have to specify the --prod flag.
$ deno task deploy --prod
Now https://YOUR_PROJECT_NAME.deno.dev targets the new deployment.
At the moment, only new deployment can be promoted to production with deployctl.
If you want to promote a specific deployment, you have to:
To automate our deployment, we will create a CI/CD pipeline with Github workflow.
We will apply the follwing rules to our workflow:
When we push to the main branch, the deployment is promoted to production.
When we push to a pull request targeting the main branch, the deployment is promoted to preview.
We will follow these steps to setup our Github workflow:
Add our access token into a secret
Configure workflow triggers
Create a build job for site generation
Create a deploy job for deployment
First, let's add our secret!
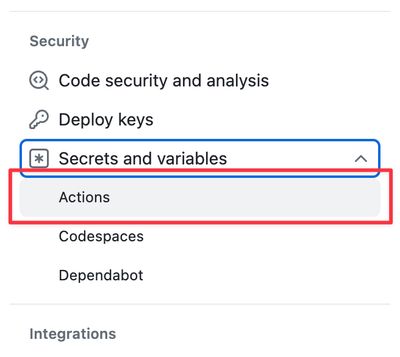
Click on Settings, the button is placed in the navigation bar of your repository.
On the sidebar on the left, look for the Security section, unfold Secrets and variables and click on Actions.
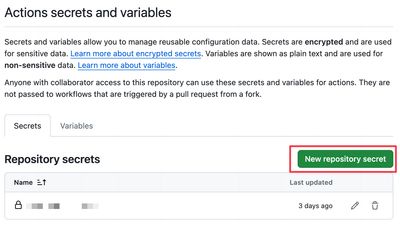
Click on New repository secret.
Specify DENO_DEPLOY_TOKEN in the name field and set your access token in the value field. Then click on the Add secret button.
Now let's edit github/workflows/deploy.yml:
// my-awesome-blog/.github/workflows/deploy.yml
name: Deployon: # Triggered when you push to `main` push: branches: - main # Triggered when you have to PR pointing to main pull_request: branches: - main
Then let's create our second deploy job, executed after the build job. This job will promote the deployment to production only when we push to the main branch:
Now it would be interesting to create to our PR with our deployment URLs.
To create this comment, we will create another step with some Javascript code. Also, we need to edit our deployment step to catch the STDOUT of our command.